How to Use RV Roof Caulk: Step-by-Step
If you're not ready for a full roof replacement, caulking is your first line of defense. Here’s a quick guide:
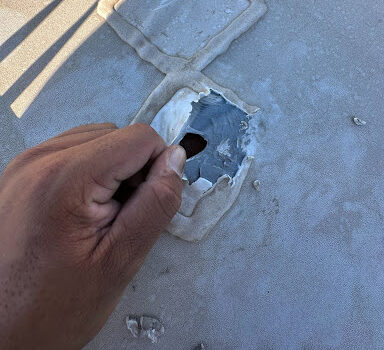
- Inspect the Roof
Look for dried, cracked, or missing caulk around seams, vents, skylights, and other roof penetrations.
- Choose the Right Caulk
Use an RV-specific caulk compatible with your roof type (TPO, EPDM, fiberglass, etc.).
- Gather Tools
You’ll need:
- Clean the Area
Remove old caulk and clean the area thoroughly. A clean surface helps new caulk adhere properly.
- Apply the Caulk
Load the caulk gun and apply a steady, continuous bead along each seam. Avoid over-applying—it wastes product and looks messy.
- Tool the Bead
Use a caulking tool or damp finger to smooth the caulk. Press gently to ensure a solid seal.
- Let It Dry
Follow the manufacturer’s drying instructions—most caulks need 24 hours before they’re fully weather-ready.
8. Reinspect Regularly
Even new caulking can fail due to movement, heat, or aging. Stay vigilant and touch up as needed.
Tired of Recaulking? ApexArmor Spray-On Roof Is the Better Way
While routine caulking is critical, it’s not a long-term solution. That’s why we developed ApexArmor Spray-On Roof—our exclusive, spray-on RV roof system that permanently solves the maintenance problem.
ApexArmor Spray-On Roof is:
- Seamless and Leak-Proof – No joints, seams, or edges that need caulking
- Maintenance-Free – No resealing, patching, or inspections required
- Stronger Than Traditional Roofs – Withstands hail, UV rays, and temperature swings
- Backed by a Lifetime Warranty – Peace of mind for the life of your RV
ApexArmor Spray-On Roof bonds directly to your RV roof and forms a rugged, weatherproof surface with no seams, no peeling, and no annual upkeep. It’s engineered to last longer and perform better than traditional materials like EPDM, TPO, or rubber membranes.